
Before beginning a project, there are some things to consider. If your
doll is rare or popular with collectors, even in poor condition it could
be quite valuable. In this case, repair to the doll
could actually lower its value. Personally, I don't like my dolls to
look like mugging victims, even if they are valuable in that state. Still,
even the greatest dolls can be in such poor shape that they can be nearly
worthless. Then there's little to lose. I suggest you find an unmarked
doll of medium size that is really in sad shape to try the techniques I'm
going to show here. If your first doll is a disaster, you haven't lost
much. On the other hand, compo is forgiving and just about everything I
show you can be repeated until you get it right. Just take your time
and have fun with this!
How to Restring Little Miss Revlon
Joanne, a neighbor brought over her Little Miss Revlon today.
She said she could find nothing on the web about restringing a Little Miss Revlon.
She also brought a fat 1" rubber band (A) she bought from Dolls Parts, tiny pliers (C), and a strung doll for reference.
We took the leg off the good doll by holding the joint under hot tap water for about two minutes, and then gently pulling and twisting, the leg came out of the socket.
Inside we found a collar pin holding the rubber band on a metal washer which held a bell-shaped guide inside the hips.
We were missing the collar pin, so I cut an inch from a large paper clip (D) with the tiny pliers and bent it to the  shape.
My only other contribution to this assembly was a bobby pin (B).
Here's the procedure:
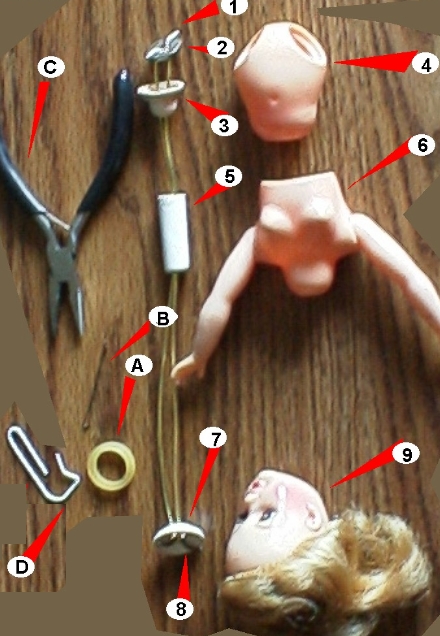
|
1 -
Hold the leg joint of the doll under hot water for a couple of minutes and then gently twist and pull the leg off to expose the hip cavity. Inside you'll find the collar pin (1), a metal washer (2) and a bell-shaped piece of plastic (3). Remove the pin and washer and leave the bell inside. If the pin is missing, make a new one like we did above with the paper clip.
2 -
Put the rubber band on the bobby pin so the pin will act as a needle for threading parts onto the band.
3 -
Put the bobby pin through the metal washer (2) and catch the band loop with the collar pin (1).
4 -
Put the bobby pin inside the hip piece (4) and into the bottom of the bell piece (3), out the top of the bell piece and out the top of the hip piece.
5 -
The rubber band is probably stretching quite a bit by now, so grasp the bobby pin at the top of the hip piece with the pliers and pull the assembly tight.
6 -
Put the bobby pin into the flat side of the tube guide (5) and out the rounded end.
7 -
Put the bobby pin into the waist chest piece (6) and out the neck. Again grasp with the pliers and putt tight.
7 -
Push the bobby pin through the neck collar (7) and pull up so the bobby pin is all the way out of the doll and the rubber band on it is exposed.
8 -
Put the second collar pin on the rubber band to hold the whole assembly together and slide the bobby pin off the rubber band.
9 -
You should now have a doll with one leg and the head missing. Twist the head onto the neck collar and the leg back into its socket and it's done!
|